Introduction to Watering New Sod
Proper care for your lawn begins from the ground up, and when it comes to establishing new sod, nothing is more crucial than watering practices. Ensuring your sod receives the right amount of water, especially in the initial stages, can significantly impact its ability to take root effectively and flourish.
- Proper watering is essential because it profoundly affects the sod’s ability to:
- Establish strong roots
- Absorb necessary nutrients
- Resist diseases and pests
- Maintain its lush, green appearance
Understanding and implementing the best practices for watering new sod will keep it green and healthy and enhance your lawn’s longevity and vibrancy. This article aims to provide a comprehensive guide to achieving this, covering every aspect, from the initial preparation stages to long-term maintenance strategies.
- We’ll explore:
- Preparatory steps before laying your sod
- Detailed watering guidelines for the first few weeks
- Tips on mowing and ongoing care
- Advanced strategies for maintaining your lawn
Embarking on this journey requires diligence, patience, and consistency. So, let’s dive in to ensure your sod gets the best start possible, setting the stage for a beautiful and resilient lawn.
Preparation Before Laying New Sod
Before the sod arrives, thorough preparation is paramount. The condition of the soil and the environment where the sod will be laid determines how well it will take root and thrive.
- Soil Preparation:
- Begin with a comprehensive soil test to determine pH and nutrient levels. Adjust as necessary following the guidelines from a reliable source on soil preparation for sod.
- Clear the area of weeds and debris, and till the top layer of soil to break up compacted earth, promoting better root growth.
Starter fertilizers are crucial in giving your new sod the nutrients it needs to establish strong roots quickly. These fertilizers are high in phosphorous, the nutrient responsible for root development.
- Importance of Starter Fertilizer:
- Apply a high-quality starter fertilizer to the soil just before laying the sod. This provides essential nutrients at the roots, where the grass needs it most.
- Ensure even application according to the recommended rates on the packaging or from expert guidelines.
Proper planning prevents poor performance, and this is especially true when preparing for sod installation. Marking sprinkler heads and boundaries ensures your irrigation system is ready to support the new sod, and the installers know precisely where to lay it.
- Marking Sprinkler Heads and Boundaries:
- Use flags or ground paint to mark sprinkler heads to avoid damage during installation.
- Define the edges of where the sod will be laid to ensure clean lines and an even layout.
Finally, the day before your sod arrives is crucial for final preparations. This involves double-checking that your soil is smooth, moist, firmly packed, yet not overly compacted. It’s also beneficial to review advanced strategies for lawn maintenance to prepare for the care your new sod will need over its lifetime.
- Preparing for Installation Day:
- Ensure the soil surface is level to avoid low spots or hills, which can affect water distribution.
- Confirm your watering schedule is set up to start immediately after installation.
By following these preparatory steps, you’re setting the stage for your new sod to successfully take root and flourish, leading to a lush, healthy lawn for years to come.
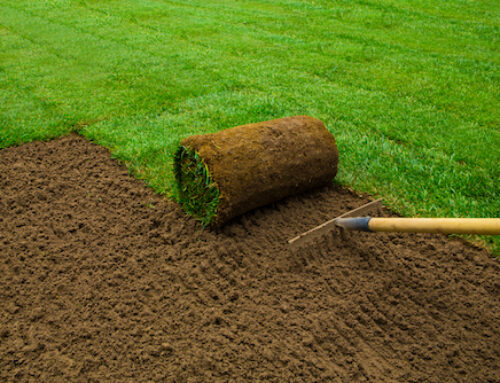
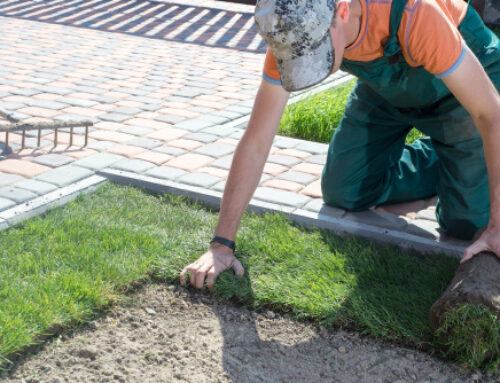
Laying the Sod and Initial Watering
Once your site is prepped, it’s time for the most transformative process: laying the sod. This stage requires precision and attention to detail to ensure that the sod takes root effectively.
- Steps for Laying Sod:
- Start by laying sod along a straight edge, such as a driveway or walkway, and work across the area.
- Butt the edges and ends against each other tightly, without overlapping or leaving gaps.
- Use a sharp knife to trim corners and edges and to fit sod around obstacles like trees or garden beds.
- Roll the sod to improve soil contact and remove air pockets.
The initial watering of your new sod is perhaps the most crucial watering it will receive. The soil beneath should be thoroughly soaked, as dry soil can rapidly pull moisture from the sod.
- Initial Water Requirement:
- Immediately after installation, water the sod until the soil is wet to a depth of 4 to 6 inches.
- Typically, this requires about 1 to 2 inches of water, depending on soil type and climate.
Uniform watering is critical to the sod’s survival. It prevents dry spots and ensures the roots develop evenly, leading to a consistent, lush lawn.
- Ensuring Uniform Watering:
- Use sprinklers to achieve even coverage across the entire lawn.
- Check for dry spots or runoff areas and adjust your watering technique accordingly.
For large sod areas, a strategic approach is necessary to keep the sod from drying out before it’s laid down and adequately watered.
- Tips for Large Sod Areas:
- Begin watering as soon as a manageable area is laid while continuing to install the remaining sod.
- Don’t wait until all the sod is laid before you start watering, as this can lead to the edges drying out and shrinking.
By following these guidelines for laying sod and the initial watering, you’re ensuring your new lawn has the best start possible, significantly impacting its health and vitality for years to come.
Mowing Your New Sod
After the crucial stages of laying and watering your sod, mowing is the next important step in maintaining your lawn’s health and aesthetics. It’s not just about controlling the grass — proper mowing practices ensure robust growth and help your lawn stay lush and healthy.
- When to Start Mowing:
- Wait until your new sod firmly roots into the soil, typically 2 to 3 weeks after installation.
- Ensure the grass is dry and the soil is firm enough to support the weight of your mower without leaving impressions.
Mowing correctly is just as important as timing. It’s not merely cutting grass down to size; it’s an art that, when done correctly, can significantly enhance the health and appearance of your lawn.
- How to Mow Correctly:
- Keep your mower blades sharp to ensure clean cuts and avoid tearing the grass.
- Mow your lawn at the highest recommended setting for your grass type to encourage deep rooting.
- Never cut more than one-third of the grass blade length at a time to prevent stress.
Dealing with grass clippings is the final step in the mowing process. While they can restore nutrients to the soil, managing them properly is essential to avoid potential issues.
- Dealing with Grass Clippings:
- If the clippings are short and thin, they can decompose naturally on the lawn, providing a nitrogen source.
- Collect and remove more extensive clippings to prevent them from smothering the grass or contributing to thatch buildup.
Adhering to these best practices for mowing your lawn encourages stronger roots, more vigorous growth, and a fuller, healthier lawn that can withstand weeds, diseases, and drought.
Long-Term Watering Strategies
After the initial establishment period, your sod will require a shift in watering practices. Developing a long-term watering strategy is essential for maintaining the health and resilience of your lawn over time.
- Transitioning to Less Frequent Watering:
- Gradually reduce watering frequency to encourage more profound root growth, transitioning from daily watering to 2-3 times per week.
- Aim for deeper, more infrequent waterings that moisten the soil to the depth of the roots.
Monitoring soil moisture is crucial, as overwatering can be as detrimental as underwatering. It’s essential to find the right balance to maintain a healthy lawn.
- Monitoring Soil Moisture:
- Use a soil probe or screwdriver to check moisture depth, ensuring the soil is damp to the root level.
- Observe your lawn for signs of drought stress, like wilting or a blue-gray color, which indicates it’s time to water.
Seasonal adjustments are necessary because your lawn’s water needs change with the weather. Being mindful of these changes will help conserve water and keep your lawn in optimal condition.
- Seasonal Adjustments:
- Increase watering during hot, dry periods and reduce it during cooler months or times of increased rainfall.
- Be aware of and comply with local water restrictions, especially during drought conditions.
By implementing these long-term watering strategies, you’ll promote a deep-rooted, drought-resistant lawn that can thrive in various conditions while maintaining its lush, green appearance.
Conclusion
Successfully establishing and maintaining a vibrant, green lawn from new sod isn’t just a chore; it’s a rewarding investment in your property’s aesthetics and value. By following the guidelines outlined in this article, you’re not just watering, mowing, and monitoring; you’re cultivating a living, breathing ecosystem that, with the proper care, will flourish under your hands.
- Keys to Successful Sod Care:
- Consistency in watering, especially during the initial weeks.
- Adherence to best practices in mowing and seasonal adjustments.
- Vigilance in monitoring soil moisture and overall lawn health.
Remember, every lawn is unique and may require specific care tailored to its environment. Stay observant, be responsive to your lawn’s needs, and don’t hesitate to seek expert advice if unusual issues arise. Here’s to the lush, thriving lawn you deserve!