A lush, green lawn is the pride of any homeowner, and achieving that perfect carpet of grass often involves the meticulous process of sodding.
Sodding, or laying down pre-grown grass, provides an instant solution to achieving a well-manicured lawn without the wait associated with seed germination.
However, the success of sodding depends on a combination of careful planning, proper execution, and ongoing maintenance. In this guide, we’ll delve into the world of sodding, providing valuable insights and DIY Tips for homeowners keen on undertaking the task themselves. Welcome to the Sodbusters’ guide to sodding success!
DIY Tips for Sodding Success
Understanding Sodding Basics
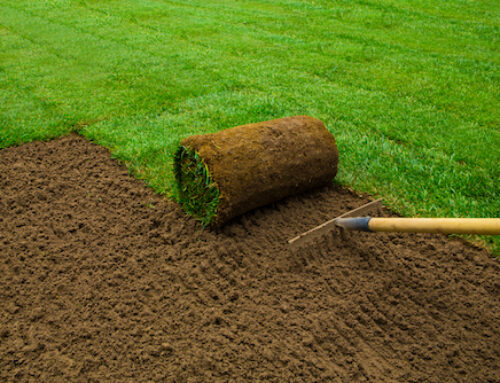
Before diving into the process, it’s essential to understand the basics of sodding. Sod, also known as turf, is a layer of grass and the soil beneath it, held together by roots.
It is typically grown on specialized farms and comes in rolls or squares for easy installation. The advantages of sodding include instant results, weed reduction, and erosion prevention. However, choosing the right type of grass for your climate and soil conditions is crucial.
Sodding is the process of transplanting mature grass, complete with its root system and soil, onto a prepared surface.
This method offers several advantages over traditional seeding, such as immediate results, reduced erosion, and a higher chance of success, especially for those with busy schedules or challenging soil conditions.
Planning for Success
Like any landscaping project, successful sodding begins with meticulous planning. Start by measuring the area you intend to sod accurately. This ensures you purchase the correct amount of sod and other materials.
Consider your lawn’s sunlight exposure, soil type, and drainage patterns. Choose a grass variety that thrives in your region, as different types have varying water and sunlight requirements.
Achieving a smooth and level surface is essential for proper sod installation. Use a rake to level the soil and create a slight slope away from structures for water drainage. Pay attention to grading to avoid low spots where water might accumulate.
Create a timeline for your sodding project, taking into account the best time to lay sod based on your local climate. Ideally, early fall or spring is recommended, as these seasons provide moderate temperatures and sufficient moisture for the sod to establish itself.
Soil Preparation
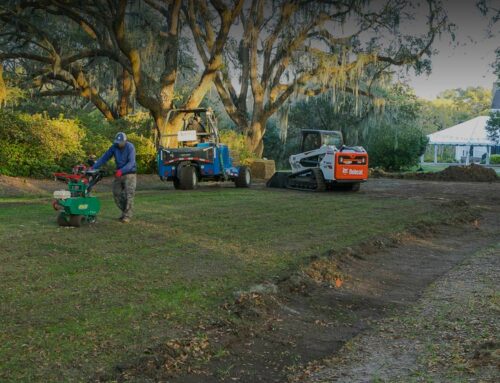
Preparing the soil is a critical step in ensuring the success of your sodding project. Begin by removing grass, weeds, or debris from the area. A sod cutter or a shovel can be used for this purpose.
Once cleared, loosen the soil using a garden tiller, ensuring it is well-aerated. Incorporate organic matter like compost to enhance soil fertility and structure.
Level the ground and address any uneven areas, taking care to fill in low spots and remove excess soil from high places. Proper soil preparation sets the foundation for healthy sod growth and root establishment.
The key to a successful sodding project lies in the preparation of the soil. Begin by removing grass, weeds, or debris from the area. Use a shovel or sod cutter to ensure a clean slate. Break up compacted soil and amend it with organic matter to improve drainage and fertility.
Choosing and Handling Sod
Selecting the right sod is paramount to the success of your lawn. Consider climate, shade tolerance, and water requirements when choosing a grass variety. Measure the thickness of the sod to ensure its quality – a thickness of about 1 to 1.5 inches is optimal.
Handle the sod rolls or squares with care, as the delicate roots can quickly dry out. Keep the sod moist but not saturated before installation. If you can’t install the sod immediately, store it in a shaded area and use it within 24-48 hours of delivery.
Selecting the correct type of sod is crucial for success. Consider factors such as your region’s climate, soil type, and the level of foot traffic your lawn will experience. Consult with local experts or nurseries to determine the best sod variety for your specific needs.
Installation Techniques
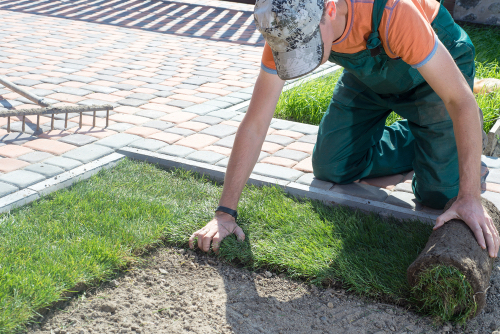
Proper installation is the key to a seamless and healthy sodded lawn. Start by laying the first row along a straight edge, like a sidewalk or driveway. Stagger the seams between sod pieces, similar to how bricks are laid, to prevent visible lines and promote a more natural look.
Press the edges of each piece tightly together to eliminate gaps, ensuring good soil-to-sod contact. Use a sod roller to press the sod into the soil and remove air pockets. Water the sod immediately after installation to help it settle and establish root contact with the soil.
When laying sod, stagger the seams in a brick-like pattern to avoid noticeable lines. Ensure the edges fit tightly together to prevent gaps where weeds can take hold. Use a sharp knife to trim the sod to fit irregular shapes or edges.
Watering and Maintenance
After installation, proper watering is crucial for the initial establishment of the sod. Water the sod thoroughly immediately after installation, and continue to water it daily for the first week.
Gradually reduce the frequency, but increase the amount of water as the sod takes root. To maintain a healthy lawn over time, consider aerating and overseeding annually. Aeration helps alleviate soil compaction, while overseeding introduces new grass varieties, enhancing your lawn’s overall resilience and appearance.
Regular maintenance is essential to keep your sodded lawn healthy. Mow the grass once it reaches the recommended height for your chosen grass variety.
Fertilize the lawn according to a schedule suitable for your region and grass type. Watch for pests and diseases, addressing them promptly to prevent damage. Before laying sod, thoroughly water the prepared soil to create an ideal environment for root establishment.
After laying the sod, continue to water it consistently for the first few weeks to help the roots integrate into the soil. Allow the sod to establish itself before mowing. Once the grass reaches the recommended height, typically 3 to 4 inches, mow it to encourage denser growth. Keep your mower blades sharp to avoid tearing the grass.
Troubleshooting and Problem-Solving
Even with careful planning and execution, issues may arise during the sodding process. Whether it’s uneven settling, weed invasion, or poor establishment, addressing problems promptly is crucial.
This chapter will cover common challenges faced by homeowners during sodding and provide practical solutions to ensure the long-term success of your lawn.
Once the sod is laid, use a sod roller to ensure good soil-to-sod contact. This helps eliminate air pockets and promotes root growth. Additionally, gently tamp down the sod with a lawn roller to create a firm connection with the soil.
Keep a close eye on your newly sodded lawn. Adjust your watering schedule based on weather conditions and the specific needs of your grass type. Be proactive in addressing any signs of pests, diseases, or nutrient deficiencies.
Mistakes to Avoid
While sodding can offer quick and impressive results for your lawn, there are common mistakes that homeowners should be mindful of to ensure the long-term success of their project.
Here are key pitfalls to avoid:
1. Insufficient Soil Preparation:
Neglecting proper soil preparation is a critical error. Ensure you remove existing grass, weeds, and debris thoroughly. Compacted soil should be loosened, and organic matter like compost should be incorporated to enhance fertility.
2. Choosing the Wrong Sod Type:
Selecting the appropriate sod variety for your specific region, climate, and lawn usage is paramount. Failure to consider factors such as shade tolerance and water requirements can lead to a mismatch, resulting in a less thriving lawn.
3. Inaccurate Measurements:
Carefully measure the area you plan to sod. Underestimating the required amount of sod or other materials can lead to unnecessary delays and added expenses.
4. Improper Installation Techniques:
Incorrect installation can compromise the overall health of your sodded lawn. Ensure proper staggering of seams, tight-fitting of edges, and thorough sod-to-soil contact. Neglecting these details may lead to gaps, uneven settling, and visible lines.
5. Inadequate Watering:
Watering is crucial for the initial establishment of sod. Neglecting to water immediately after installation and in the following weeks can hinder root growth and overall success. Establish a watering schedule based on the needs of your sod and local weather conditions.
6. Neglecting Maintenance:
Regular maintenance is vital for a healthy, vibrant lawn. Skipping tasks like mowing, fertilizing, and pest control can lead to a decline in the quality of your sodded area over time.
7. Ignoring Early Signs of Issues:
Keep a vigilant eye on your newly sodded lawn. Promptly address any signs of pests, diseases, or nutrient deficiencies. Ignoring early warnings can result in larger, more challenging problems.
By steering clear of these common mistakes and following the Sodbusters’ guide meticulously, you’ll enhance the chances of achieving a lush, resilient, and visually appealing sodded lawn. Remember, success in sodding extends beyond the initial installation—it requires ongoing care and attention for lasting beauty.
Conclusion
Sodding your lawn can be a rewarding and fulfilling project, providing you with an instant, vibrant carpet of grass. By following Sodbusters’ guide to sodding success, you can navigate the process with confidence, from careful planning and soil preparation to proper installation and ongoing maintenance.
Remember, a beautiful lawn is about instant gratification and a long-term commitment to nurturing and caring for your green oasis. Happy sodding!